

React is a popular framework for web development, used by many developers to create powerful apps. Created by software engineer Jordan Walke during his time at Facebook and released in 2013, React has quickly become one of the most popular frameworks for web development.
While it is an excellent tool for app development, there are a few things you have to keep in mind when using it to make sure your apps run as efficiently as possible.
The team at Influize has gathered ten proven React optimization techniques to help developers optimize the performance of their React apps.
What Actually Makes React JS Performance Faster: 10 Essential Tips to Consider
Use lazy loading of React components
One of the benefits of React JS is that it helps developers create UI components that can be dynamically loaded on the page instead of loading them all at once. Since users don't have to download your entire app upfront, this allows for faster page loads and improved user experience.

Lazy loading is a common React optimization technique developers use to make sure that only the content that is visible on the screen is loaded at any given time. Doing so significantly reduces loading time and saves on data transfer costs, both of which lead to a less clunky user experience.
When it comes to React performance optimization, lazy loading of components can be used in two different ways:
Component-level lazy loading using React Suspense creates lazy loading of components that aren’t needed right away (e.g., a dashboard or widget). This feature allows you to indicate the location where a component should be loaded, and it will defer that component until it’s needed.
import React, { Suspense, lazy } from 'react';

const ChartWidget = lazy(() => import('./ChartWidget'));

function Dashboard() {
  return (
    <div>
      <h1>Main Dashboard</h1>
      <Suspense fallback={<div>Loading chart...</div>}>
        <ChartWidget />
      </Suspense>
    </div>
  );
}
In this example using React.lazy and Suspense:
- ChartWidget is only loaded when it’s actually rendered.
- While it’s loading, the fallback (Loading chart...) is shown instead.
- This reduces your initial bundle size and speeds up the first load.
Route-level code-splitting with React Router v6+ ensures only the components needed for a given page are loaded at any one time. This will reduce the number of requests sent to the server and help improve page loading time. It will also reduce data transfer costs and ensure that users are only loading the content they need at any given time.
You’ll still wrap your routes with <Suspense> somewhere higher up:
<Suspense fallback={<div>Loading page...</div>}>
  <App />
</Suspense>
A tip from Influize devs: Lazy loading boosts your time on site and web conversions when paired with loading indicators and skeleton UIs. That way, users never feel like they’re waiting on something broken.
Use CSS animations instead of JS animations
CSS provides developers with the capability to produce animations for HTML components without JavaScript. By offloading animation responsibility to the browser, it can improve React app performance.
Even though JavaScript is excellent for creating these animations and, in the case of JS-based animation libraries like Velocity and GSAP, might actually be better than CSS in certain cases, native CSS transitions generally have much better performance and take fewer lines of code to create the same effects.
Let's look at an example of a simple fade-in, written with JavaScript-based animation:
useEffect(() => {
  const el = document.getElementById('box');
  el.style.opacity = 0;
  let opacity = 0;
  const interval = setInterval(() => {
    opacity += 0.1;
    el.style.opacity = opacity;
    if (opacity >= 1) clearInterval(interval);
  }, 100);
}, []);
And that same example written using CSS-based animation:
/* styles.css */
.fade-in {
  opacity: 0;
  animation: fadeIn 0.5s ease-in-out forwards;
}

@keyframes fadeIn {
  to {
    opacity: 1;
  }
}
import './styles.css';

function Box() {
  return <div id="box" className="fade-in">Hello!</div>;
}
With the latter, the browser does the heavy lifting and frees up your JavaScript for more important logic.
CSS animations are also more reliable, as they can be used even in browsers that don’t support JavaScript or have it disabled. This means there's no risk of a user not being able to see some of your web content simply because their browser doesn’t recognize it.
Think about it this way: Fleexy ran a study and found that a 1-second delay tanks conversions by 7%, a 3-second delay by 20%, and a >3-second delay by a whopping 53%. If your ecom site does $10k per day, that equates to an annual loss of anywhere from $255,500 to $1,934,500+.
WE ARE LEADING CUSTOM WEB DEVELOPMENT COMPANY
Built by full-stack pros. Optimized by marketers. Trusted by startups and enterprises who care about performance, conversions, and scale.
Let's talk - Schedule a call with our expert team today to see how we can help!
Use web workers for CPU-intensive tasks.
We love web workers.
When you run heavy calculations (like parsing large JSON files, image manipulation, or complex loops) directly in React, you risk freezing the UI and making your app feel unresponsive.
What web workers do is they take expensive computations off the main thread, improving React app performance by freeing up resources for other tasks. This makes your application more responsive and enjoyable to use.
To utilize web workers in your React application, you first have to create a worker.js file containing the code that runs off the main thread (like in this example of crunching a big data set).
// Public/worker.js
self.onmessage = function (e) {
  const data = e.data;
  // Simulate expensive work
  let result = data.reduce((acc, num) => acc + Math.sqrt(num), 0);
  self.postMessage(result);
};
Then you need to import it into your App.jsx and pass the data to the worker.
import { useEffect, useState } from 'react';
function App() {
  const [result, setResult] = useState(null);
  useEffect(() => {
    const worker = new Worker(new URL('./worker.js', import.meta.url));
    const numbers = Array.from({ length: 1000000 }, (_, i) => i);
    worker.postMessage(numbers);
    worker.onmessage = (e) => {
      setResult(e.data);
      worker.terminate();
    };
  }, []);

  return <div>Result: {result ?? 'Calculating...'}</div>;
}
Once that's done, you can use the postMessage API to receive messages from the worker when it’s done with its tasks.
Web workers are especially useful for CPU-intensive operations like image processing and large calculations that could otherwise slow down your app. But you can also use them for less expensive operations like rendering elements or making API calls.
A tip from Influize devs: Web workers are ideal for non-UI logic. Avoid trying to manipulate the DOM inside them because they don’t have access to it.
Consider server-side rendering.
By default, React uses client-side rendering to generate HTML for the browser. This approach is not very performant as each page load requires multiple requests to the server and JavaScript execution.
Server-side rendering, on the other hand, pre-renders HTML for each page request which dramatically improves React app performance. This approach is especially useful for SEO because search engines can crawl and index the rendered content faster.
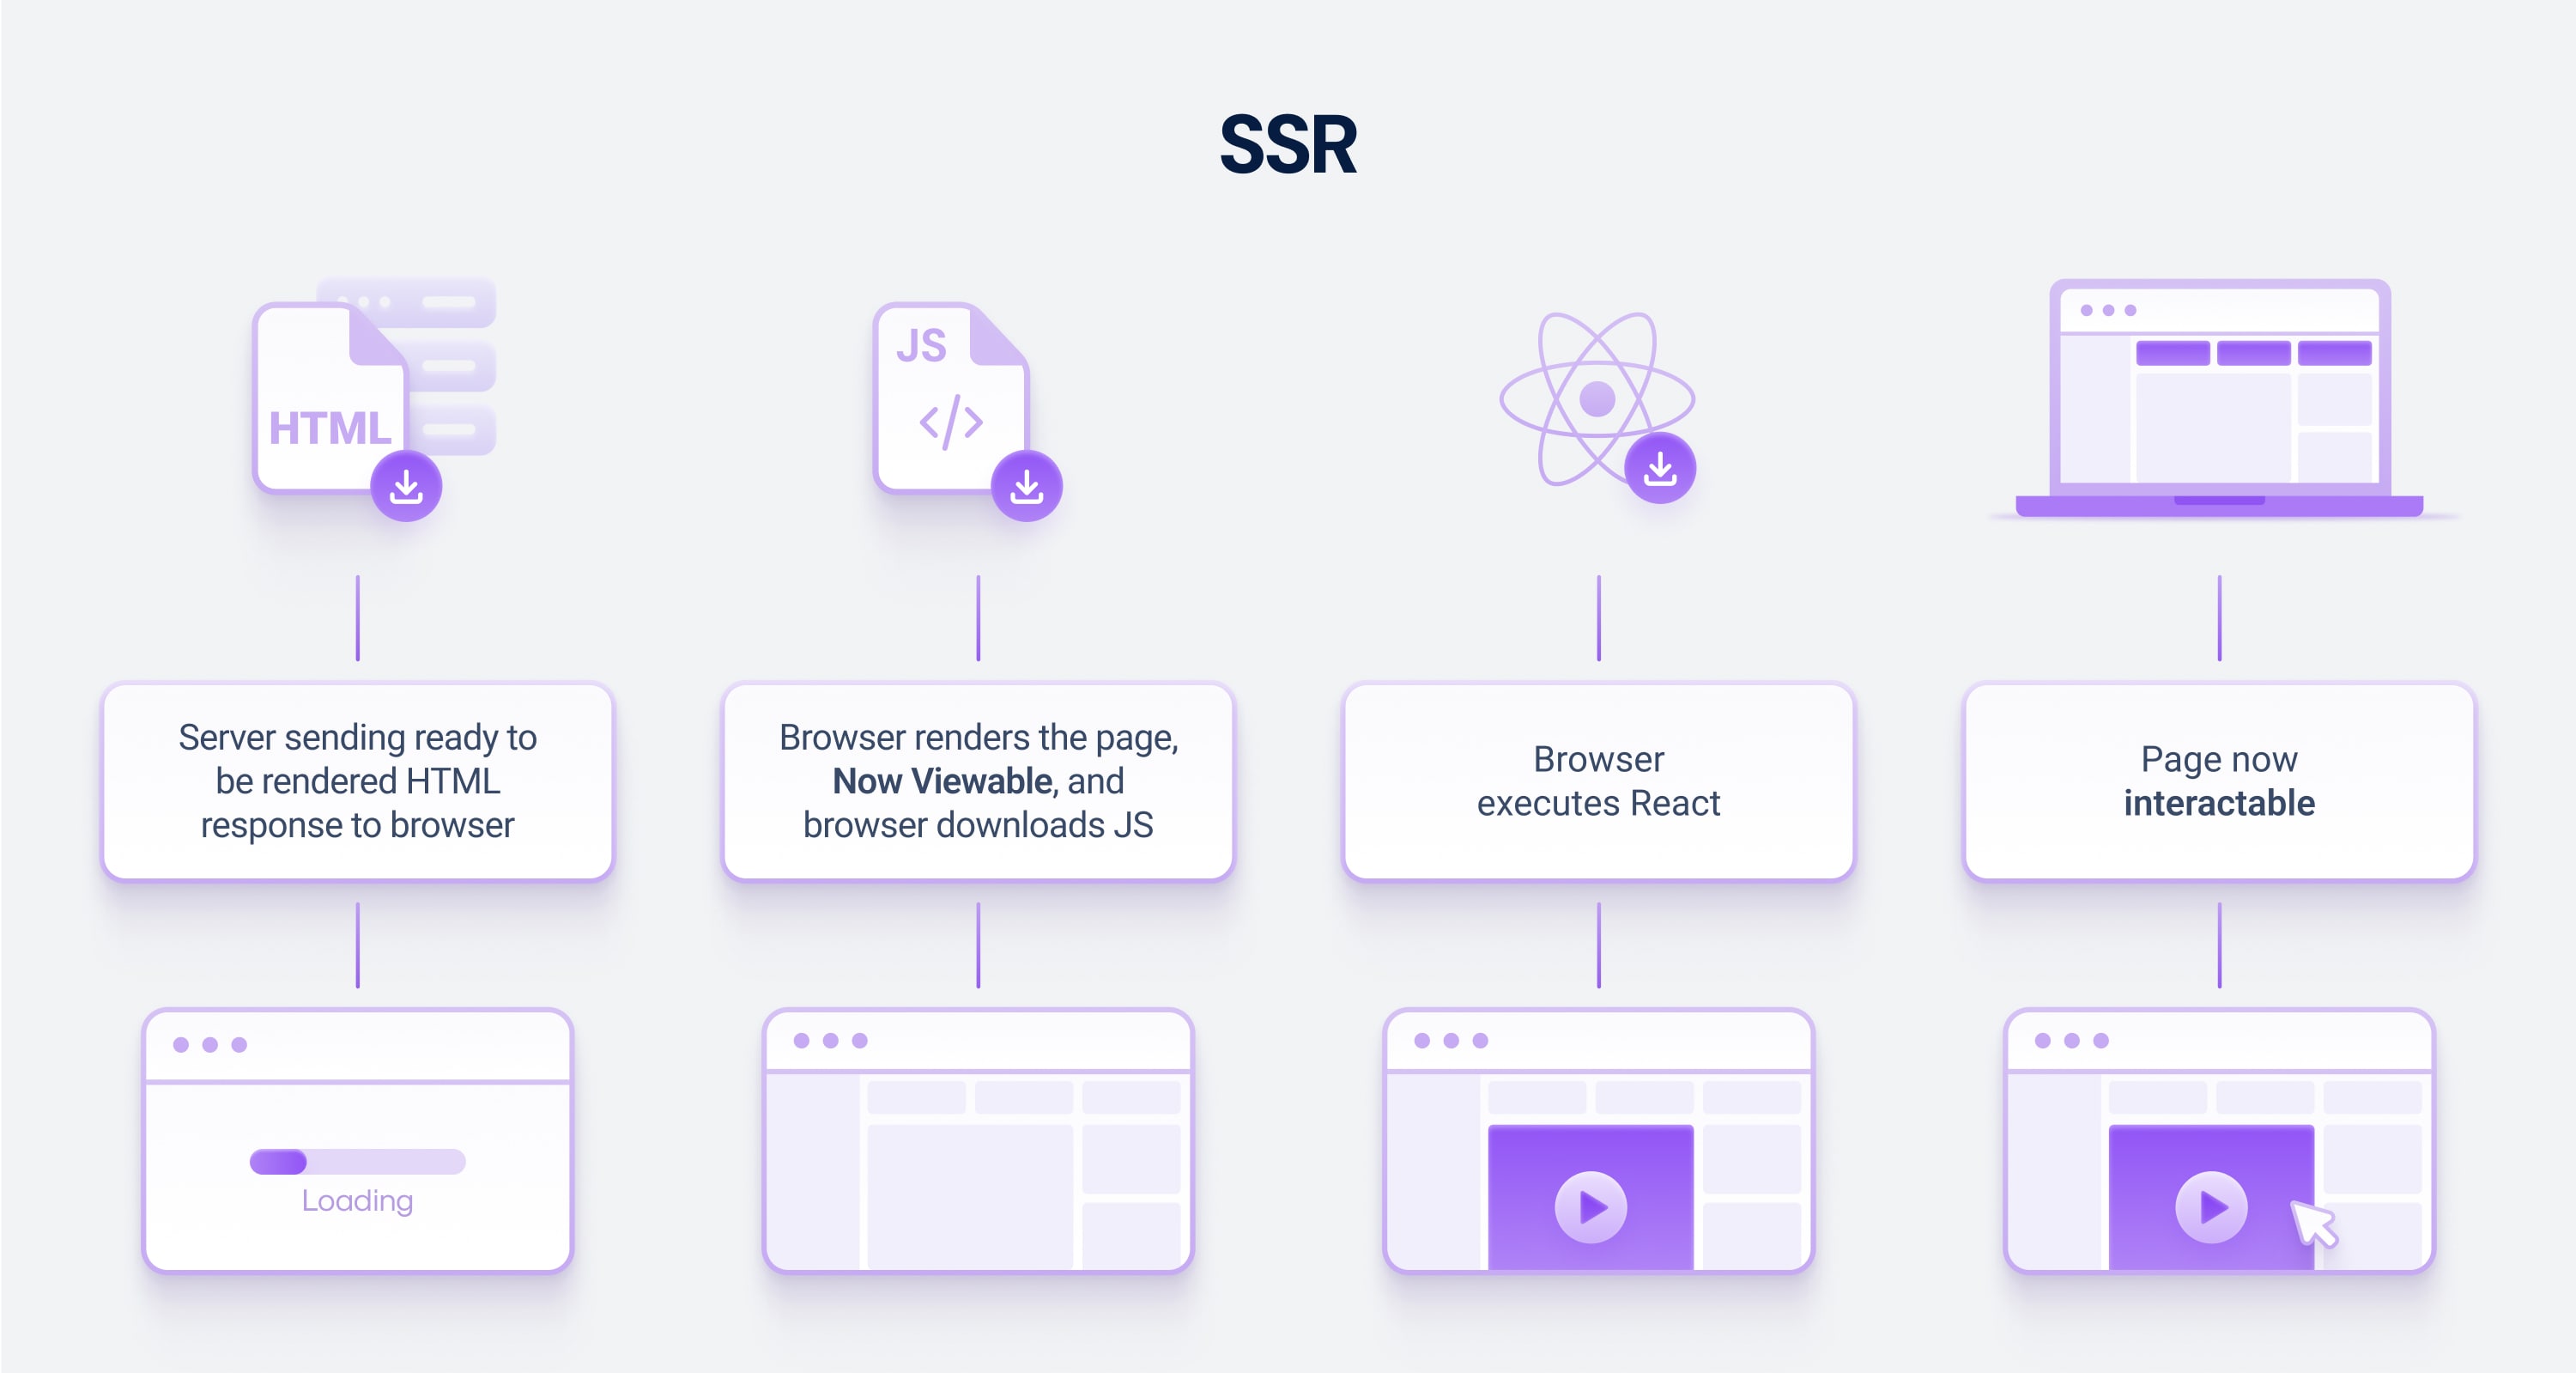
Next.js is the most popular framework for adding SSR to React.
In this example:
- The API data is fetched on the server.
- HTML is sent to the browser with content already in place.
- The React app hydrates afterward, adding interactivity.
When comparing Angular vs. React or Node.js vs. React, server-side rendering is something we see as a key advantage for both.
Server-side rendering is also safer because it prevents users from accessing content they should not be able to see. Even if you try to access data from relational databases or NoSQL databases, server-side rendering ensures that this information goes to the front-end, rather than to the client. This protects your application from malicious actors and ensures compliance.
To implement server-side rendering with React, you can use the ReactDOMServer API. This API allows you to render components on the server and return HTML instead of JavaScript, which can then be served to the browser.
IMPORTANT: Keep in mind that SSR isn’t always the right answer. Use it for landing pages, SEO-critical routes, and first-load performance. For apps behind login walls, static or client-side rendering might still be faster and simpler.
Enable Gzip compression on the web server.
Gzip compression is a (non-React-specific) technique used to reduce the size of files by compressing them before they are sent over the network. This can improve React app performance by reducing the amount of data that needs to be transferred.
When enabled on your server, gzip compresses your static assets (like .js, .css, .html, etc.) before sending them to the browser, often reducing file sizes by 70% or more.
| File | Uncompressed | Gzip Compressed |
|---|---|---|
| main.js | 800 KB | 220 KB |
| styles.css | 120 KB | 30 KB |
| bundle total | 1.2 MB | ~350 KB |
To enable Gzip compression on NGINX:
gzip on;
gzip_types text/plain application/javascript text/css;
To enable it on Express (Node.js):
import compression from 'compression';
app.use(compression());
Most modern web servers are capable of automatically compressing assets if they detect the Accept-Encoding header in the request. So, if your web server is configured correctly, Gzip compression can almost always be enabled without additional coding.
Avoid using inline style attributes (when possible).
When going through your React performance monitoring process, you might come across inline style attributes. These are CSS style declarations that are written directly into the HTML, rather than in a separate stylesheet.
They aren't always problematic (and are rather convenient). But in larger React apps, they can sometimes make code less maintainable. Since they are defined directly in the JSX, it might be a challenge to keep track of all the styles you've applied to a particular element.
For example:
<div style={{ backgroundColor: 'blue', padding: '10px' }}>Hello</div>If this style is reused across 100+ elements, every one of them gets processed separately.
To optimize React performance, try to avoid this wherever possible and move your styling into either of the following:
CSS modules (scoped styles with unique class names):
import styles from './Box.module.css';

<div className={styles.blueBox}>Hello</div>
Styled-components / Emotion (CSS-in-JS libraries for dynamic styling):
const BlueBox = styled.div`
  background-color: blue;
  padding: 10px;
`;

<BlueBox>Hello</BlueBox>
Tailwind CSS or utility-first frameworks (ultra-lean, fast, and highly reusable):
<div className="bg-blue-500 p-2">Hello</div>This'll make your code more organized and easier to maintain. Additionally, your React app will render faster as only one file has to be fetched from the server instead of multiple inline styles.
In addition to making your code more maintainable, using external CSS files also improves caching performance (inline styles can’t be cached by the browser). The browser can cache the style sheet and serve it directly from its cache when the page is requested again, reducing the amount of time it takes to render the page.
Memoize React components.
A well-known optimization technique that can be applied to React apps is memoization. This involves caching the output of a function so that it doesn’t need to be recalculated every time the same inputs are passed in.
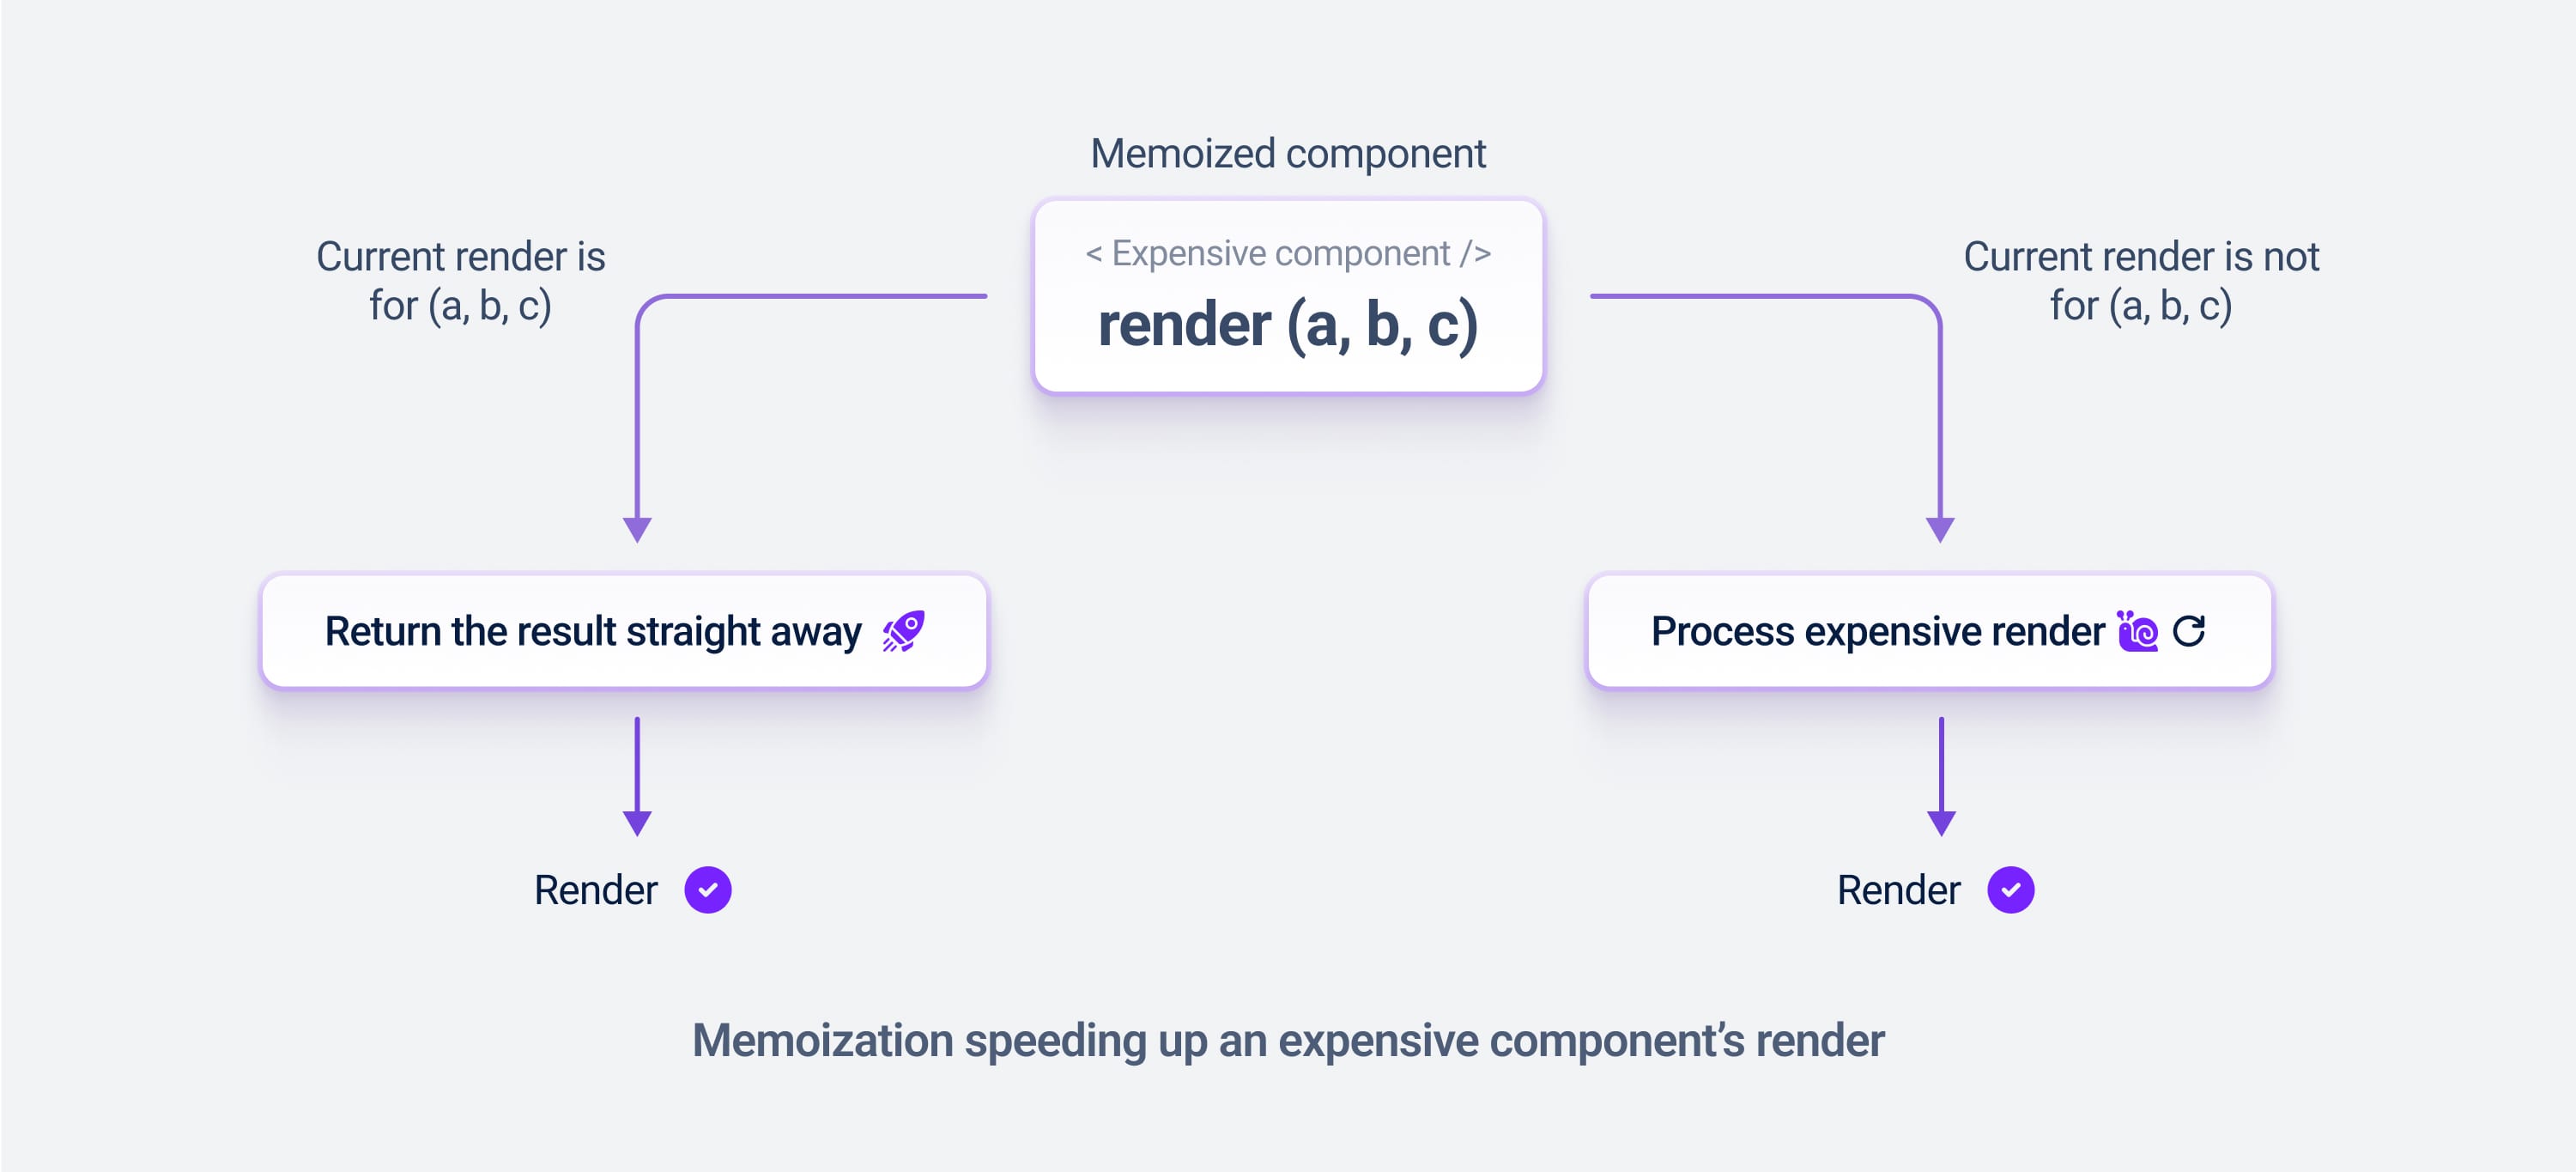
In React, devs can use memoization to cache the output of components and avoid unnecessary re-rendering. Similar to functional components, React.memo is used to wrap class components and create a “memoized” version of the component that only re-renders when its props are changed.
Here's an example:
const UserCard = React.memo(function UserCard({ name, email }) {
  console.log('Rendering UserCard:', name);
  return (
    <div>
      <h3>{name}</h3>
      <p>{email}</p>
    </div>
  );
});
If the parent component re-renders, UserCard will only re-render if its name or email props change.
This makes it especially useful for:
- List items in a virtualized table
- Static widgets that don't rely on frequent updates
- Components with expensive rendering logic (e.g., charts)
Of all the React performance optimization techniques, it's actually among the most powerful. From a performance perspective, it is one of the most efficient methods as it avoids unnecessary computations and improves the overall speed of your application.
In addition to improved performance, memoization can also help with code clarity. By using “memoized” components, you can make sure that only components which have changed will be re-rendered and thus make the code easier to read and maintain.
Avoid unnecessary context re-renders with useContextSelector or state hoisting.
React Context is great for sharing global data, like user info, themes, or feature flags. But there's a hidden performance trap: every component that consumes a context will re-render when any value in that context changes, even if it only uses one piece of that data.
In large apps, this can silently degrade performance as updates ripple through your component tree.
Option 1: Use useContextSelector.
Instead of consuming the whole context, you select just the piece you care about. This prevents unnecessary re-renders.
You can use use-context-selector, a lightweight library that solves this problem quite nicely.
const ThemeContext = createContextSelector();

function ThemeProvider({ children }) {
  const [theme, setTheme] = useState('light');
  const value = useMemo(() => ({ theme, setTheme }), [theme]);
  return <ThemeContext.Provider value={value}>{children}</ThemeContext.Provider>;
}

// Only rerenders when `theme` changes
const theme = useContextSelector(ThemeContext, v => v.theme);
Option 2: Hoist state higher and use props instead.
Sometimes, the better choice is to avoid context entirely and lift state up. Then pass only what’s needed via props, which makes updates easier to control and debug.
Each component now only re-renders when its relevant prop changes, giving you precise control without context bloat.
Remember, though, that React’s built-in context isn’t designed for high-frequency updates. For performance-critical shared state, consider alternatives like Zustand or Jotai, which are optimized for granular updates.
Use React's built-in performance tools.
React has several amazing performance tools that can help you identify and fix performance issues in your application. It's not directly tied to performance, but it's an important part of your diagnostic strategy.
One of the most popular tools is React DevTools, a browser extension for Chrome and Firefox that provides an interface for analyzing the component tree, detecting potential performance problems, debugging the data flow between components, and more.
React also provides a built-in profiler, which gives developers a detailed look at how their code is performing. The profiler allows you to track your application’s performance over time and helps identify potential bottlenecks that can be optimized for improved performance.
Here's an example workflow:
- Open your app in the browser.
- Open React DevTools → “Profiler” tab.
- Click “Record” and interact with your app.
- Stop recording and review slow renders (they’ll be highlighted in red).
- Investigate those components — consider React.memo, useMemo, useCallback, or state restructuring.
In DevTools settings, you can also enable "Highlight updates when components render." You’ll visually see what’s being re-rendered as you interact.
import React from 'react';
import whyDidYouRender from '@welldone-software/why-did-you-render';

whyDidYouRender(React);
This third-party library will log all your unnecessary renders in the console, which is great for deep debugging.
Frequently Asked Questions
Is React slower than Vanilla?
When it comes to developing a user interface, React has the upper hand. With Vanilla JS, large applications often require UI updates, making the codebase difficult to sustain. To update a UI element in Vanilla JS, you must first locate it in the DOM - an extra step that React doesn't require.
Which DOM is used by React to improve performance?
React uses a virtual DOM to improve performance. A virtual DOM keeps a copy of the actual DOM and compares it with any changes made in the code. If there are any differences between the two, React will only update the necessary parts in the actual DOM, making the process faster and more efficient.
Why is NextJS faster than React?
When comparing Next JS vs React JS, Next JS has the added benefit of being faster than React. Its server-side rendering capabilities make it easier to load pages quickly, reducing page loading times and improving the user experience. That said, hiring the right React JS development services is key to getting the most out of React.
Should I build my app in React Native or React JS?
When deciding between React Native vs. React JS, the right choice depends on your project's needs. While React Native is great for developing mobile and cross-platform apps, it is made for native mobile applications. React JS is better suited for websites and web applications.